
Use the Merge function to easily combine multiple images using Blend, Merge and A/B Ratio operations.
Note: Starting in HCImage 4.2.0, with the implementation of the SideBar, new features have been added to HCImage including a new way to combine images using Blend and Merge. The current method for blending and merging images is valid and is described below. This section will be updated in a future release to include a description and information on the added features. For information on the new drag and drop method of merging multiple images please see "How to Merge Several Monochrome Images."
A typical application of Merge is to show multi-channel fluorescence on a background image from a normal or enhanced transmitted light source. The Menu allows selection of the color components and images to be used for the Base Image and Overlay Image(s). These options allow an image to be created which displays one or more of its color components overlaid on another image, or on one of its components shown in gray-scale mode.
The Base Image is shown as the background image. A monochrome or color image can be used, or a Red, Green or Blue color component from the initial image. In the case where a single color component is used, this image is treated as a monochrome image.
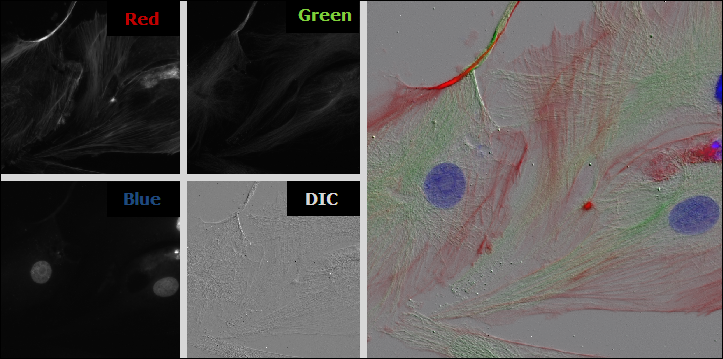
In a three-color image acquisition, it may be that one component of the data is gray-scale, from transmitted illumination, showing detail of the external shape and size of a cell, and the other components are of fluorescing areas of labeled structures within the cell, showing no context of the cell border.
With the three-color image selected, click the Merged Display Properties icon (
Select the components to be overlaid in each color channel from the Overlay Image Display.
| Color Channel | Color Component | For 3-Color Image | For Monochrome Images |
|---|---|---|---|
| Red | Red Image Data | Red Image Data | Alexa 647 |
| Green | Green Image Data | Green Image Data | Alexa 488 |
| Blue | Blue Image Data | Blue Image Data | Dapi |
Note: Use the contrast function to compress the intensity range of the selected image making it appear to have more contrast and emphasizing values between these limits. The changes in contrast are only applied to the selected image. Both slider and spin controls make it possible to interactively change the range while viewing the result. The values can be entered manually if known. For 16-bit images, the intensity scaling is from 0 to 65535. The full dynamic range of the original image is maintained, and the Display Contrast range allows flexibility in selecting which portion of the information to enhance for visual interpretation. For more information on this topic see "Contrast."
Use the Blend tool to blend 1 gray and up to 10 images into a single image layer. Each image can be individually contrasted and or tinted.


To create a Ratio Image select A/B Ratio from the Merge Display drop-down. Select the image color for A and B and assign the absolute Min and Max value of your ratio experiment. Click the A and B buttons to enter an intensity threshold for the corresponding A or B image.

Apply pseudocolor to the ratio image by clicking on the Contrast Properties and selecting the pseudocolor from the drop-down list.
